

Worm
Let worms eat your organic waste! They will happily turn it into some of the best fertilizer on earth - worm compost, otherwise known as “worm castings” or “vermicompost.” A fascinating, fun and easy way to recycle your organic kitchen wastes, vermiculture:
- Requires very little work
- Produces no offensive odors
- Helps plants thrive
Only a few things are needed to make good worm compost: a bin, bedding, worms and worm food. By following the steps listed below, you will learn to make, maintain and use your own worm compost.
Worm Bins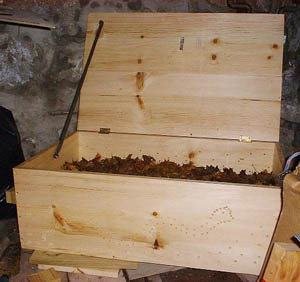
Your bin needs to be only 8″to 16″ deep, since compost worms are surface feeders. You can build your own bin by using a washtub, dish pan, used shipping crate or a commercially available worm bin. Just be sure your bin has a lid to keep out flies and rodents. It also needs holes in the bottom (a quarter inch or smaller), for ventilation and drainage.
The rule of thumb for bin size is two square feet of surface area per person, or one square foot of surface area per pound of food waste per week. Because worms like moderate temperatures, place your bin in a shady location where it will not freeze or overheat, like a kitchen corner or a basement.
Bedding Materials
Black and white newspaper is the most readily available and easy-to-use bedding material. Tear it into strips about one inch wide and moisten so it is as damp as a wrung-out sponge. Cow or horse manure can also be used to lighten bedding and absorb excess moisture.
A handful or two of soil, ground limestone or well-crushed eggshells every few months are good for providing grit and calcium. Fill your bin with moistened bedding, toss in a few handfuls of soil, and you are ready to add the worms and food. Over time, the bedding and food are eaten by the worms and turned into dark worm compost.
Types of Worms
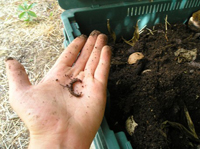
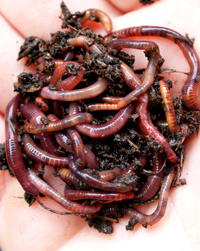
The best kind of worms for composting are “red worms” or “red wigglers.” They are often found in old compost piles, but are different from the earthworms you would normally find in the ground. These worms have a big appetite, reproduce quickly and thrive in confinement. They can eat more than their own weight in food every day! When purchasing red worms, one pound is all you need to get started.
Feeding Your Worms
Worms like to eat many of the same things we eat, only they aren’t so picky. Some of their favorites include:
- Stale bread
- Apple cores
- Orange peels
- Lettuce trimmings
- Coffee grounds
- Non-greasy leftovers
- Vegetable scraps
Begin feeding your worms only a little at a time. As they multiply, you can add larger quantities of food waste. Bury the waste into the bedding regularly, rotating around the bin as you go. When you return to the first spot, most of the food you buried there should have been eaten. If not, don’t worry. Just feed the worms less for a while.
Methods for Collecting Your Finished Worm Compost
After you have been feeding your worms for three to six months, you may notice the bedding has been eaten, and you can begin harvesting the brown, crumbly worm compost. Harvesting the compost and adding fresh bedding at least twice a year is necessary to keep your worms healthy.
Method 1:
Move the contents of your worm bin to one side, place fresh bedding in the empty space and bury your food wastes there for a month or so. Harvest the other side after the worms have migrated to the new food and bedding.
Method 2:
Remove one-third to one-half of the contents of your bin, worms and all, and add the worm compost to your garden soil. Add fresh bedding and food to your bin.
Method 3:
Spread a sheet of plastic out under a bright light or in the sun. Dump the contents of the worm box into a number of piles on the sheet. The worms will crawl away from the light into the center of each pile and you can brush away the worm compost on the outside by hand. Soon you will have wriggling piles of worms surrounded by donut-shaped piles of worm compost.