Introduction to CSS (Cascading Style Sheets)
Styling a Web Page in XHTML
Instead of using presentational attributes such as color or size, which are not valid in XHTML, you use Cascading Style Sheets (CSS).
CSS Rules
Cascading Style Sheets are a set of rules that govern the display of the document through a web browser. The rules simply are lines of command codes that tell the browser how to display the information. It is crucial with CSS to get the syntax of the command lines correct.
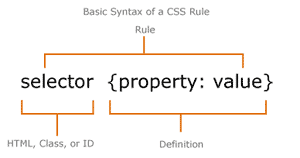
What does a rule look like?
 |
The SELECTOR selects (determines) which HTML element you’re working with. HTML elements are common tags like <body>, <H1>, <p>. Often the selector is referred to as an element selector or a type selector. The DECLARATION tells the browser what to do with the Selected element. It consists of two parts: The PROPERTY, which identifies which attribute like font type, size and color, for example, is called into play. The VALUE, determines how the attribute works, in other words it causes the action that changes the font type, size and color to what the property asks for. |
A declaration is always signaled by a { bracket and is ended with a closing }.
A property is separated by a : and a ; ends each declaration.
An example of a Declaration:
 |
Why does the code look like this? Browsers can read the code in single lines or in staggered lines like the example above. The reason for the staggered line is so our eyes can more easily catch errors that can end up costing programming time. |
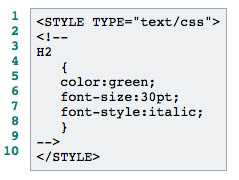
The CSS code below is the basic structure for using styles. Styles are set by adding a <STYLE ...> element to the <HEAD> section of your page. The following code, which should be copied into the <HEAD> section, sets a style rule for <H2 ...> elements:
 |
Line 1 opens the <STYLE ...> element. Line 2 opens an HTML comment. The comment hides the styles code from search engines and older browsers that don't understand the <STYLE ...> tag. Line 3 begins our style rule. A style rule has two parts: the selector, which indicates which element(s) the style applies to, and a list of declarations (surrounded by curly braces) which define how the element should be presented. In line 3 the selector indicates that the rule applies to all <H2 ...> elements. Line 4 has the opening curly brace that begins the list of declarations. The declaration in line 5 says that the font is green. Line 6 says that the font should be 30 points tall, and line 7 says that the font should be italic. Line 8 closes the curly braces, ending the list of declarations. Finally, line 9 closes the comment and line 10 closes the style element. The rules automatically apply to all <H2 ...> elements. |
Adding Inline Styles
To attach inline styles directly to an html tag, use the style attribute. The value of the style attribute would contain a series of css rules.
CSS rules always follow the following format...
property: value
where property is the name of the css property you want to change (for example color) and value is the value you want to assign to it (for example red).
To make a paragraph of text red, use the following HTML syntax
<p style="color: red">Red Text</p>
More than one rule can be added by using a semicolon between rules
<p style="color: red; font-weight: bold ">Centered Red Text</p>
CSS Typography
- font-family: "Arial, Helvetica, sans-serif"
- Generic families (serif, sans-serif, monospace, cursive, fantasy)
- font-size: pixels, %, ems, keywords (relative and absolute)
- font-weight, font-style, font-variant, letter-spacing, line-height, text-indent, word-spacing
- font: style variant weight size/line-height family;
- color: keyword or #hex code;
- text-align: center|left|right|justify;
CSS Background Color/Image
- background-color: keyword or #hex code;
- background-image: url(path/filename.jpg);
- background-repeat repeat, no-repeat, repeat-x or repeat-y
- background-position: keywords, %, pixels or ems
- background-attachment: fixed or scroll
- background: color url(path/filename.jpg) repeat attachment position;
Styling Lists
To control the type of bullet displayed in an unordered list (<ul>), use the list-style-type CSS property
<ul style="list-style-type: square">
Displays as...
- Square
Using Images as Bullets
<ul style="list-style-image:url(images/mappin.gif)">
- List 1
- Item 2
- Bullet
CSS Float property
Allows you to "float" an element to the left or right edge of its parent/containing element, thus creating the effect of subsequent elements wrapping around the element.
- style="float: right" or style="float: left"
CSS Clear property
To end the float effect and stop further elements from wrapping around a float element, apply the clear property with a value that matches the float or floats you want it to stop wrapping around. This will push the element down so it begins at the bottom of the floated element.
- style="clear: left;", style="clear:right", style="clear: both"
Float layouts
While the float property was originally intended primarily to allow magazine-style layouts for sites, with text wrapping around an image or quotation, they are commonly used for complex layouts, and therefore understanding floating and clearing behavior in css is key for developing advanced css-based layouts.
Separating CSS from (X)HTML
- <style type="text/css" media="screen|print">CSS rules here</style> (In the head)
- <style type="text/css" media="screen|print">@import url(path/filename.css);</style> (external)
- <link rel="stylesheet" type="text/css" href="path/filename.css" media="screen|print" /> (external)
CSS Selectors
When you have moved your CSS into a separate file and you are no longer using inline CSS styles directly in your HTML, you must specify which HTML elements each one of your CSS rules should apply to. You do this using a CSS selector. CSS declarations contain a selector that selects which elements the style applies to (e.g. all <p> elements, all elements with a class attribute with a value of "copyright", the element with an id attribute with a value of "masthead"), and one or more rules (property/value pairs), separated by semi-colons.
selector { property: value; }
- Type Selector: p (applies to all paragraph elements)
- Class Selector: .copyright (applies to all elements with a class attribute set to "copyright")
- ID Selector: #masthead (applies to the element with an id attribute set to "masthead")
- Descendent Selector: #masthead p (applies to all paragraph elements inside of an element with an id of "masthead")
- Combining Selectors: div#masthead (applies only to a div with an id of masthead), p.copyright (applies only to paragraph elements with a class of copyright)
Sample CSS Declarations
p {
	font-weight: bold;
	color: red;
}

div#navigation {
	width: 160px;
	float: right;
}

blockquote p.quote {
	background-image: url(images/quotes.gif);
}

