Photoshop - Tools Palette
Selection Tools

The Move tool (V) lets you drag a selection or layer to a new location in the image, and also to other images. You can also use the Move tool to align selections and layers and distribute layers within an image.
You can access Move tool by pressing (V) on your keyboard or hold-down Ctrl(Command) keys. Press and hold Shift key while draging your mouse will constrain movement with a multiple of 45°(0°, 45°, 90° and so on..). Press Ctrl(Command) + Alt(Option) to copy and move objects.

The Marquee Tools (M) let you select rectangles, ellipses, and 1-pixel rows and columns. By default, a selection border is dragged from its corner. You can also hold down following keyboard keys while dragging mouse to make selections or perform specific options.
* Shift+Drag: To constrain the marquee to a square or circle.
* Alt+Drag (Option for Mac): To start drag marquee from center..
* Alt+Shift+Drag: To start drag selection from center and constrain to square.
* Spacebar: Hold down spacebar while making a selection (keep pressing mouse button). To reposition selection.

The Lasso tool (L) and the Polygonal Lasso tool (L) lets you draw both straight-edged and freehand segments of a selection border. With the Magnetic Lasso tool (L), the border snaps to the edges of defined areas in the image.
While you are using Lasso tool you can hold-down Alt(Option) key to switch between draw free-hand and draw straight-edged.

You can use the Quick Selection tool (W), new in Photoshop CS3, to quickly paint a selection using an adjustable round brush tip. As you drag, the selection expands outward and automatically finds and follows defined edges in the image.
The Magic Wand tool (W) lets you select an area by color range without having to trace its outline. You can specify the color range, or tolerance, for the Magic Wand tool's selection at tool's option bar. Enter a low value to select the few colors very similar to the pixel you click, or enter a higher value to select a broader range of colors.
Crop and Slice Tools
![]()
Cropping is the process of removing portions of an image to create focus or strengthen the composition. You can crop an image using the Crop tool and the Crop command (Image » Crop).
The Crop Tool (C) works similarly to the Rectangular Marquee tool . You can Drag to draw a Rectangular area to select part of image you want to include. Also, the Crop tool includes a bounding box around a selected area that allows you to resize, move or perspective the select area similar Free Transform Command. You can also crop and resize your selected area to the target resolution that you specify in the option bar.

Use the Slice Tool (K) tool to divide a large image into small connected pieces of a rectangular image that is useful in building websites. You can select the slice area manually or create from guides, by clicking the Slice from Guide button at Slice Tool option bar.
To move, duplicate, combine, divide, resize, delete, arrange, align, and distribute user slices, using Slice Select Tool (K). You can save the slice to an html file that includes all pieces plotted to an html table that are re-connected show as a complete large image when viewing by a web browser.
Retouching Tools

The Healing Brush tool (J) lets you correct imperfections, causing them to disappear into the surrounding image. Like the cloning tools, you use the Healing Brush tool to paint with sampled pixels from an image or pattern. However, the Healing Brush tool also matches the texture, lighting, transparency, and shading of the sampled pixels to the source pixels. As a result, the repaired pixels blend seamlessly into the rest of the image.
The Spot Healing Brush Tool (J) is different from the Healing Brush Tool in that it does not require you to make a selection or define a source point before using it. You can select a blending mode for the healing, and choose between proximity match or create texture. You can also sample all layers which allows you to use the spot healing tool on a new layer for non-destructive editing.
The Patch tool (J) lets you repair a selected area with pixels from another area or a pattern. Like the Healing Brush tool, the Patch tool matches the texture, lighting, and shading of the sampled pixels to the source pixels. You can also use the Patch tool to clone isolated areas of an image.
The Red Eye Tool (J) corrects red eye errors that may be produced by using electronic flash. You can roughly select around the eye and set pupil diameter to easily correct the red eye.

The Clone Stamp Tool (S) can be used to correct your image. It allows you to paint with a sample from an area you select by holding down the Alt Key, to another image or part of the same image. You can also clone part of one layer over another layer. Because you can use any Photoshop Brush with the Clone Stamp tool, you have a lot of control over the size of the area you clone. You can also use opacity and flow settings in the options bar to adjust the way you apply the cloned area.
The Pattern Stamp Tool (S) takes a sample from a Pattern preset instead from a sample point in the image. You can select a pattern from the pattern libraries or create your own patterns.

The Eraser Tool (E) deletes pixels in the image as you drag through them. If you're working in the background or in a layer with transparency locked, the pixels change to the background color. Otherwise, the pixels are erased to transparency. You can also use the eraser to return the affected area to a state selected in the History palette.
The Background Eraser Tool (E) allows you to erase the background while maintaining the edges of an object in the foreground. By specifying different sampling and tolerance options, you can control the range of the transparency and the sharpness of the boundaries.
The background eraser samples the color in the center of the brush, also called the hot spot, and deletes that color wherever it appears inside the brush. It also performs color extraction at the edges of any foreground objects, so that color halos are not visible if the foreground object is later pasted into another image.
When you click in a layer with the Magic Eraser Tool (E), the tool automatically changes all similar pixels. If you're working in the background, or in a layer with locked transparency, the pixels change to the background color; otherwise, the pixels are erased to transparency. You can choose to erase contiguous pixels only or all similar pixels on the current layer.

The Blur Ttool (R) softens hard edges or areas in an image to reduce detail as you drag. You can specify area and amount of blur by modifying brush shape and dynamic. The Blur tool blurs an image by lessening the amount of color contrast between neighboring pixels. In contrast, the Sharpen Tool (R) focuses soft edges to increase clarity and selectively sharpens by increasing the contrast between neighboring pixels.
The Smudge Tool (R) simulates the actions of dragging a finger through wet paint. The tool picks up color where the stroke begins and pushes it in the direction you drag. This tool can be effective for smoothing out colors and textures.

The Dodge Tool (O) and Burn Tool (O) are used to lighten or darken areas of the image, the names are based on a traditional photographer's technique. Photographers hold back light to lighten an area on the print (dodging) or increase the exposure to darken areas on a print (burning).
The Sponge Tool (O) subtly changes the color saturation of an area depending on the mode you're selected. In Desaturate mode, the Sponge tool reduces the amount of color when working inside a color image. If you switch to Saturate mode, the Sponge tool adds more color in color images. In Grayscale mode, the tool saturation mode increases contrast of the image and the opposite, desaturation mode, decreases contrast by moving gray levels away from or toward the middle gray.
Painting Tools

The Brush Tool (B) and Pencil Tool (B) paint/draw a line of any thickness that you specify via the Options bar. You can make the line sharp or blurry, but it's always slightly soft for the Brush Tool, and a hard edge stroke for the Pencil Tool. Normally, the Brush tool and Pencil tool applies a continuous stream of color and stops applying color whenever you stop dragging.
The Color Replacement Tool (B) simplifies replacing specific colors in your image when you paint. You can paint over a targeted color with a corrective color. For example, You can select sample color as red, and painted foreground color to correct a person's red eyes in an image. The Color Replacement tool doesn't work in images in Bitmap, Indexed, or Multichannel color modes.

This tool works similar to the Brush Tool except the History Brush (H) and Art History Brush Tool (H) allow you to paint from specified history state or snapshot as the source data. The History Brush tool paints by recreating the specified source data, while the Art History Brush tool uses that data along with the options you set to create different colors and artistic styles.

The Gradient Tool (G), fills a solid or blended color to any area of the image. The Gradient tool creates a gradual blend between multiple colors. You can choose from preset gradient fills or create your own.
The Paint Bucket Tool (G) fills adjacent pixels that are similar in color value to the pixels you click. It works very similar to Magic Wand tool but the Paint Bucket fills with solid color instead of making a selection.
Drawing and Type Tools
![]()
Use the Path Selection Tool (A) to select a path component (including a shape in a shape layer) and click anywhere inside the path component. If a path consists of several path components, only the path component under the pointer is selected. To display the bounding box along with the selected path, select Show Bounding Box in the options bar.
Use the Direct Selection Tool( A) to select a path segment and click one of the segment's anchor points or drag a marquee over part of the segment. To select additional path components or segments, select the Path Selection tool or the Direct Selection tool, and then hold down Shift while selecting additional paths or segments.

Use the Horizontal Type Tool (T) and the Vertical Type Tool (T) to create horizontal or vertical type anywhere in an image. When you create type, a new type layer is added to the Layers palette. In Photoshop, you can also create a selection border in the shape of the type.
Depending on how you use the type tools, you can enter point type or paragraph type. Point type is useful for entering a single word. You can create point type by click in the image to set an insertion point for the type. The paragraph type is useful for entering and formatting the type as one or more paragraphs. You can create paragraph type by drag the tool to define a bounding box for the type.
The Horizontal Type Mask Tool (T) or Vertical Type Mask Tool (T) let you create a selection in the shape of the type. Type selections appear on the active layer, and can be moved, copied, filled, or stroked just like any other selection.

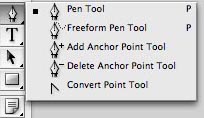
The Pen Tool (P) lets you create straight lines and smooth flowing curves as new Path or Shape Layer or Fill Pixels, by selecting its icon at tool option bar. For most users, the Pen tool provides the best control and greatest accuracy for drawing. The Freeform Pen Tool (P) lets you draw as if you were drawing with a pencil on paper. Anchor points are added automatically as you draw. You do not determine where the points are positioned, but you can adjust them once the path is complete. The Magnetic Pen is an option of the Freeform Pen tool that lets you draw a path that snaps to the edges of defined areas in your image. You can define the range and sensitivity of the snapping behavior, as well as the complexity of the resulting path. The Magnetic Pen and Magnetic Lasso tools share many of the same options.
You can add or delete or convert anchor points using Add Anchor Point Tool and Delete Anchor Point Tool . If you have selected Auto Add/Delete in the options bar for the Pen tool or Freeform Pen tool, when you click at active path's line segment, a point is added, and when you click an existing point, it is deleted. The cursor will change to a penpoint cursor with a + sign to indicate that you can add anchor point or change to a penpoint cursor with a - sign while you hover the cursor over existing point.
The Convert Point Tool lets you convert a smooth curve to a sharp curve or to a straight segment, and vice versa. While you using Pen tool or Freeform Pen tool you can also convert anchor point by hold down Alt(Option), the cursor will turn to Convert Point Cursor, key and click at the point you want to convert.

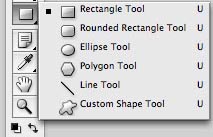
Photoshop provides six Shape Tools that enable you to draw geometric and predefined shapes. By default, the shapes are separated off into independent Shape layers, which are a mix of objects and pixels. The vector-based outlines of the shapes print at the maximum resolution of your printer, but the interiors may consist of solid colors, gradients, or pixel-based patterns and images.
Note, Measurement and Navigation Tools

The Notes Tool (N) and Audio Annotation Tool (N) allow you to add notes and audio annotations anywhere on a Photoshop image canvas. When you create a note, a resizable window appears for typing text. When you record an audio annotation, you must have a microphone plugged into the audio-in port of your computer.
You can import both kinds of annotations from Photoshop documents saved in PDF or from Acrobat documents saved in PDF or Form Data Format (FDF).

The Eyedropper Tool (I) samples color to designate a new foreground or background color. You can click to sample color to assign to foreground from the active image or from anywhere else on the screen, or hold-down Alt(Option) key and click to sample color assign to background color.
You can also specify the area sampled by the Eyedropper tool. For example, you can set the eyedropper to sample the color values of a 3-by-3-pixel area under the pointer. Modifying the sample size of the eyedropper affects the color readouts displayed in the Info palette.
The Color Sample Tool (I) lets you assign up to four permanent color sampler points, with before/after value for color adjustment. The color value will show in new section at the bottom of Info Palette.
The Ruler Tool (I) calculates the distance between any two points in the work area. You can use the Ruler tool to measure location, angle and distance which is show in option bar and also Info Palette. The Ruler Tool can also be used to correct the angle of rotation when use with Rotate Canvas Command.
You can use the Count Tool (I) to count objects in an image. To count objects manually, you click the image with the Count tool and Photoshop tracks the number of clicks. The count number is displayed on the item and in the Count Tool options bar. Photoshop can also automatically count multiple selected areas in an image, and record the results in the Measurement Log Palette.
![]()
If the entire image is not visible in the document window, you can navigate to bring another area of the image into view by using the Hand Tool (T). To pan an image, click and drag your image to navigate over the image. While you use another tool you can temporarily switch to use Hand Tool by holding down Space-bar, your cursor will turn to a Hand Cursor.
![]()
Use the Zoom Tool (Z) to magnify or reduce your view using various methods. The window's title bar displays the zoom percentage (unless the window is too small for the display to fit), as does the status bar at the bottom of the window. When Zoom Tool selected your cursor will turn to Zoom in Cursor, and Click the center of the area of the image you want to magnify or drag over the area to magnify that area inside the zoom marquee to displayed at the highest possible magnification. To zoom-out hold-down Alt(Option), your cursor will turn to Zoom-out Cursor, click on the center of area of the image you want to reduce.
Switch Color, Foreground Color, Background Color

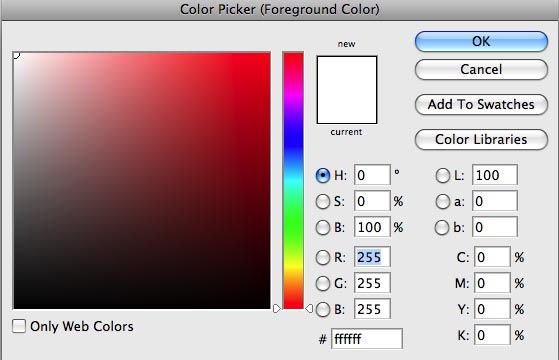
Click on the Foreground or Background Color squares to choose the Color Picker. Click on the arrows to switch the Foreground and Background colors.


