Inserting Images

Normal Images

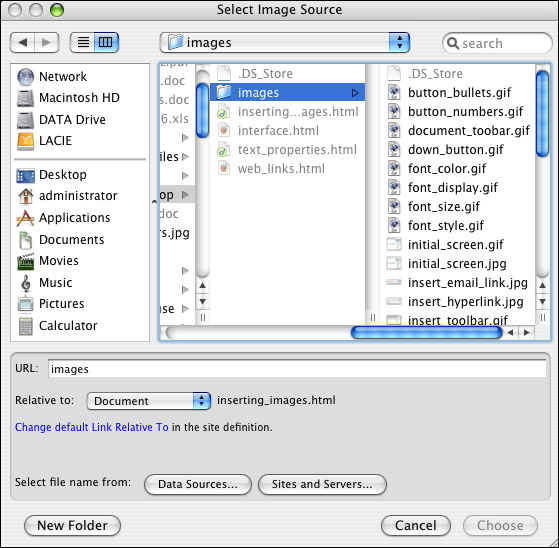
To insert an image go to the Insert menu, and then select the Image option. After this it's possible to select an image in the next window. If for any reason you need to insert a BMP, it will not appear unless you select All the files in the Type field.

insert  image menu

In the Relative to option you can specify whether the image will be relative to the document or to the site root folder. It's better if it's relative to the Document because if you move the site to a different location you may not see the image.

The path where the image is will be in the URL field of the window, and later in the SRC field of the properties inspector. The way this path will be inserted will depend on whether it has been inserted as relative to the root folder, or to the document.

For example, imagine that the images folder and the document in which we want to insert the image is inside the root folder. An image, called insert_email_link.jpg is inside the images folder. In case of inserting the image as relative to the Document, the path would be: images/insert_email_link.jpg.

In the case of it being inserted relative to the Site Root the path would be: /images/insert_email_link.jpg.

It's just like when you create a hyperlink to a file related to the document or to the site root folder.

If you insert a BMP into a document, it will not be correctly shown in Dreamweaver, although it does in the browser.
In Dreamweaver it will be shown like this:bmp crash

This is the same image that appears in Dreamweaver when an inserted image isn't found.
This will happen if you have modified the name of the image, or if you have moved it to another directory.
In this case, the image you will see in the browser will be like this:no image

It's a blank square with a red X, next to the image name or the contents of the Alt field in the properties inspector.

Rollover Images

A rollover is an image replaced by another when the mouse rolls over it. This kind of image is used on menus and buttons. Here, is an example of a rollover.
Point at it to see what happens.      Medium Closeup rollover button      Click on it and see what happens.

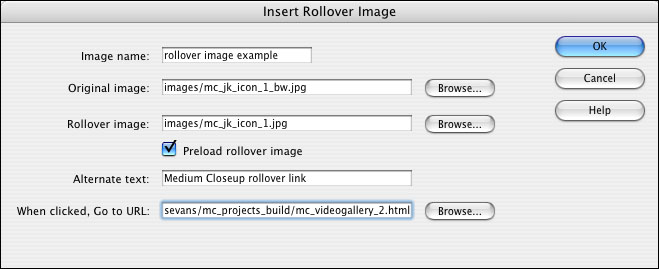
  • Image Name: In the Image Name text box, type a name for the rollover.
  • Original Image : In the Original Image text box, click Browse and select the image you want displayed when the page loads, or enter the image file's path in the text box.
  • Rollover Image : In the Rollover Image text box, click Browse and select the image you want displayed when the pointer rolls over the original image, or enter the image file's path in the text box.
  • Preload Rollover Image : If you want the images preloaded in the browser's cache so no delay occurs when the user rolls the pointer over the image, select the Preload Images option.
  • Alternative Text: (Optional) In Alternate Text, enter text to describe the image for viewers using a text-only browser.
  • When Clicked Go to URL: In the When Clicked Go to URL text box, click Browse and select the file, or type the path to the file that you want to open when a user clicks the rollover image. NOTE, If you don't set a link for the image, Dreamweaver inserts a null link (#) in the HTML source code to which the rollover behavior is attached. If you remove the null link, the rollover image will no longer work.

Flash Buttons

There is another set of special images similar to rollovers that are used to create menus, these are the Flash buttons.
Below we see an example of a flash button. Place the mouse over it to see what happens.

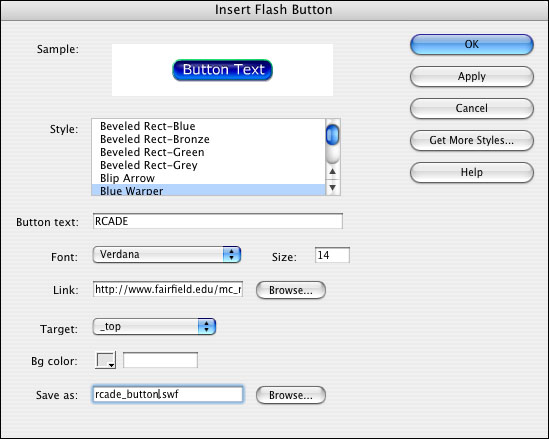
To insert a flash button you need to go to the Insert menu, Media, and Flash Button option, and you will see this dialogue box:

insert flash button

  • Style: Select the button style you want from the Style list. You can view an example of the button in the Sample text box. Click the sample to see how it functions in the browser. NOTE While you are defining the Flash button (for example, changing text or font choices), the Sample text box does not automatically update to reflect the changes. These changes will appear when you close the dialog box and view the button in Design view.
  • Button Text : (Optional) In the Button Text text box, type the text you want to appear. This text box only accepts changes if the selected button has a {Button Text} parameter defined. This is shown in the Sample text box. The text you type in replaces the {Button Text} when you preview the file.
  • Font: In the Font pop-up menu, select the font you want to use. If the default font for a button is not available on your system, select another font from the pop-up menu. You will not see the font you selected in the Sample text box, but you can click Apply to insert the button in the page to see what the text will look like.
  • Size: In the Size text box, enter a numeric value for the font size.
  • Link: (Optional) In the Link text box, enter a document-relative or absolute link for the button. This is the URL the browser will open when the visitor clicks the button.
  • Target: (Optional) In the Target text box, specify the location in which the linked document will open. You can select a frame or window option in the pop-up menu. Frame names are listed only if the Flash object is being edited while in a frameset.
  • Bg color: (Optional) In the Bg Color text box, set the background color for the Flash SWF file. Use the color picker or type in a web hexadecimal value (such as #FFFFFF).
  • Save As: In the Save As text box, enter a filename to save the new SWF file. You can use the default filename (for example, button1.swf), or type in a new name. If the file contains a document-relative link, you must save the file to the same directory as the current HTML document to maintain document-relative links.
  • Get More Styles : Click Get More Styles to go the Macromedia Exchange site and download more button styles.