Working with TablesAll objects are aligned on the left side of the web site by default. But thanks to the tables it's possible to distribute the text in columns, place the images next to a text block, and many more things we could not do without the tables. Although in page layout, proper design practice is the use of CSS <div> tags, many web sites are still based on tables. Tables are useful for layout within CSS <div> tags and for the display of tabular data. Tables are composed of a set of cells and are distributed in rows and columns. Below is an example of a table:
|
Insert a Table
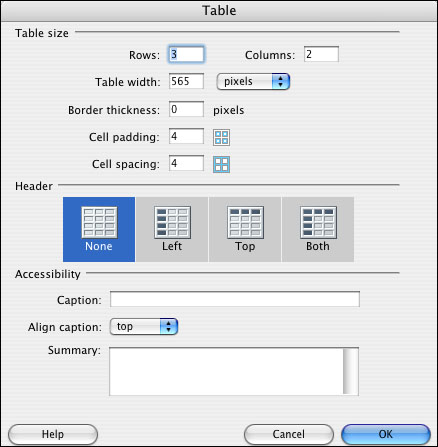
To insert a table go to the Insert menu, and then select the Table option.

- Rows and columns: In the new window you will need to set the number of Rows and Columns, and the width of the table.
- Table width: The Width can be defined in Pixels or as a Percent. The difference between these is that the width in Pixels is always the same, independent of the size of the browser window in which you are viewing the page, while the width in Percent shows the percentage of the browser window that will be occupied by the table and therefore it wil be adjusted relative to the size of the browser window. This allows users with a large screen to take advantage of the width of it.
- Border thickness: indicates the border thickness of the table in pixels. It is assigned a one (1) by default. Set it to (0) for no border.
- Cell Padding: indicates the space between the cells content and the their borders.
- Cell Spacing: indicates the space between the table's cells.
- Header: A heading for the table can also be established, and it is recommendable to use headings in the case of users that use screen readers. Screen readers read headings and help the users to follow the table information.
- Caption: If you want to include a title, set it in the Caption option - the title will show up outside the table.
- Allign caption: In align caption we indicate where we want to align the title in respect to the table.
- Summary: In Summary: we indicate a description for the table which screen readers will read, remember that this text will not be visible in the user's browser.
| Cells are the squares that compose a table and are the intersection of the rows and the columns. To insert any element into a cell such as text or images, you just have to place the cursor in there.
|
||||||||||||||||||||||
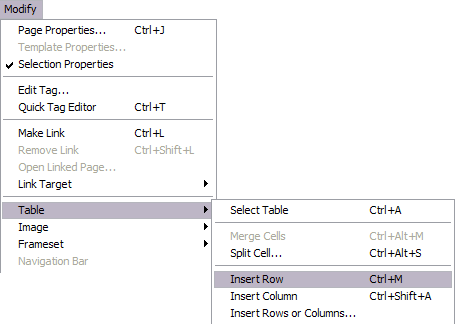
Table FormatThe table properties are specified through its properties inspector. To open this window, click on the border that surrounds the table, or click on the <table> tag that is on the status bar of the document's window. Open the Modify option and choose Table.
When you select a table or when you place the pointer over any part of it, Dreamweaver shows its width and the one of each column. Along the widths are the pull-down panels (heading of the table menu and heading of the column menu). Those menus allow us to quickly access specified commands related to the table. To select a column or a row, place the mouse next to the top or left border of the column or row and press the CMD key (Mac) or CTRL key (Win) while clicking the mouse.
The top of the properties inspector in this case is used to specify the text properties which will be inserted in the selected cell (or cells). The bottom part is used to specify the value of the each cell such as the color or the background image (other than that specified in a global table), the cell border color, etc. Two options that you may possibly need to use frequently will be the Horz and Vert, which define the content of the cell in a horizontal or vertical way. |
Combining and Dividing CellsIt is possible to insert tables into other tables. This is called Nesting tables. Below is an example of nesting. As you can see, in the first cell, another table has been inserted. |
|
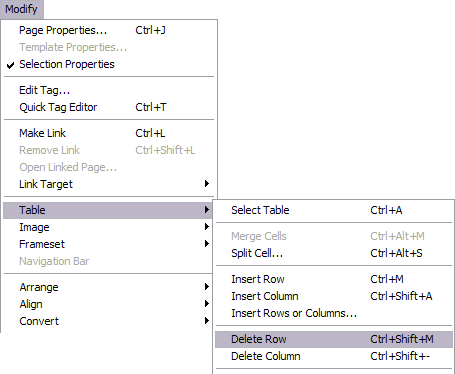
To nest tables, you just have to place the mouse in the cell where you want to insert the new table, and then insert it the way we have just seen. Combine cells consists of converting two or more cells into just one. This will clear the separating border between the cells and they will become one. This can be useful, for example, to use the first row to write the table's title. In this case you would have to combine all the cells of the first row into just one. Dividing cells consists of spliting them. One of the ways of dividing or combining cells, is through the properties inspector. If many cells are chosen they can be combined by clicking on the
|


 This Division was created in September 1998 in recognition of the critical importance of information and technology for Fairfield University's learning environment. In general the goals of I S are to provide a better framework for technology and strategic planning and to align technology goals and objectives with institutional priorities.


